This piece was originally published in my journal/weblog on Wednesday, 23 June 2004.
« Penmachine.com home « Long article index
Bring an old-style Apple menu back to life in Mac OS X 10.3 Panther, using the built-in Classic status menu
by Derek K. Miller
![]() If you find this article useful, feel free to consider making a donation (any amount, credit cards accepted), which helps pay for hosting this website. Thanks!
If you find this article useful, feel free to consider making a donation (any amount, credit cards accepted), which helps pay for hosting this website. Thanks!
 Ah, the Apple menu—one of the few things Mac OS X users miss about the old Mac OS (well, other than a properly spatial Finder, but let's not go there). I'm here to tell you that, with the latest version of Mac OS X, version 10.3 "Panther," you can have it back. Sort of, almost as good as new. But first some history (or you can skip straight to the instructions).
What's the big deal with the Apple menu?
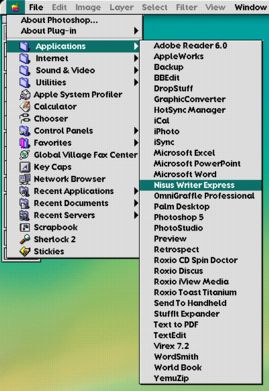
Back in the day—circa 2001 and earlier—there was a simple rainbow-coloured menu in the upper left corner of your Mac screen, and just by moving some files around you could fill it with whatever you wanted: frequently used applications, folders, files, even an alias to the entire contents of your hard disk.
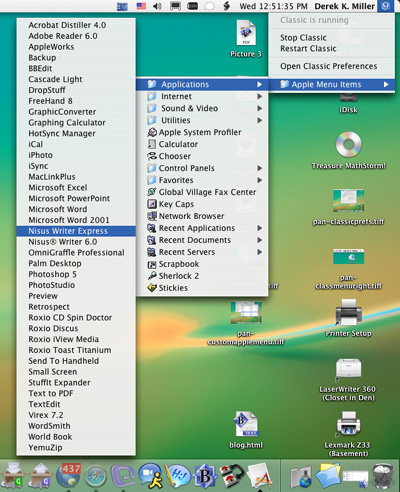
Once you'd done that, one click on the apple brought out a lovely hierarchical menu (shown in the first screenshot), and with a few mouse moves and another click, you could easily launch what you needed at that moment. It was simple and elegant, and what it contained was pretty much totally up to you. It took advantage of Fitts's Law by being near the corner of the screen—though including the actual corner of the screen as part of the menu target would have been even better.
But Apple, especially since the return of big boss Steve Jobs in 1996, has long had a "we know better than you" complex in some areas, and the Mac OS X Apple menu shows it. When Mac OS X was in beta testing, there wasn't any Apple menu at all, just an Apple logo in the middle of the menu bar, where it didn't do anything. Later Apple gave in and brought the Apple menu back, but its contents were fixed and not as useful as the old customizable one.
Whenever Apple falls down, third-party developers step in. You can download Classic Menu or Fruit Menu to replicate the old Apple menu's features, and more, but they aren't built into the OS, and have to run as processes alongside other applications. They offer a lot of cool features, but it would be nice of Mac OS X just had a proper Apple menu again. And now it does. Kind of.
Turn on Panther's Classic status menu (which is not Classic Menu)
From the Mac OS X Public Beta to version 10.0, and right through 10.2 "Jaguar," third-party utilities or awkward hacks like adding a hard disk or folder to the Dock were the only ways to go. But with version 10.3 "Panther," that's changed, with the new Classic status menu (unrelated to the Classic Menu third-party application I mentioned above). Here's how you turn it on: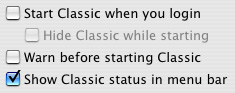
- Open System Preferences, either by choosing Apple menu > System Preferences... or by clicking its icon in the Dock.
- Click the Classic preference icon (in Panther, that's in the fourth row, under System).
- Check the checkbox labeled "Show Classic status in menu bar" (see the second screenshot).
- Close or quit System Preferences.
Now, in the menu bar, you'll have a black-and-white menu extra of a small number "9" (representing Mac OS 9). That's the Classic status menu, from which you can control the startup, shutdown, and preferences of the Classic environment that runs older Mac applications. It also—and here's the key—includes the Apple Menu Items folder from Mac OS 9. However, if you're like me, you have a bunch of such menu extras enabled, and the Classic status menu is buried within them. The next thing to do is move it to the corner so it's more efficient to reach.
Put the Classic status menu in the upper right corner
You can move menu extras around in the menu bar, including the Classic status menu (as well as the Displays, Volume, Scripting, Date & Time, and Fast User Switching menu extras, among others). Just hold down the Command (i.e. Apple) key while you click and drag them back and forth, or even right off the menu bar to remove them.
Unfortunately, you can't move any menu extra, including the Classic status menu, to the left side of the menu bar, where the regular menus (including the new, un-customizable Mac OS X Apple menu) live. So we'll do the next best thing: move it to the upper right corner of the screen:
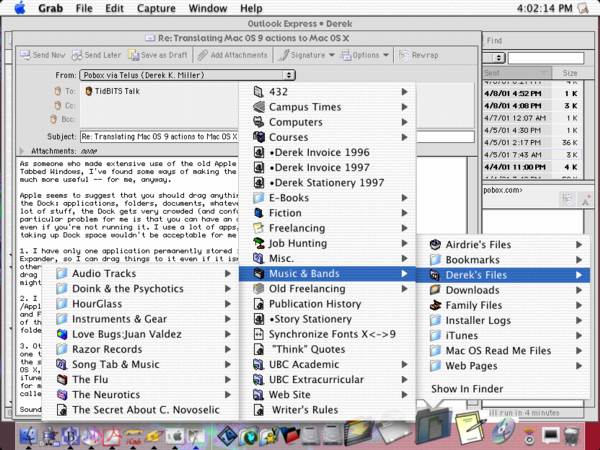
- Make sure you can see the little "9" Classic status menu icon in the menu bar at the top of the screen.
- Hold down the Command key on your keyboard.
- Continue to hold the Command key as you click and drag the Classic status menu icon as far to the right as it will go (see the third screenshot).
- Release the mouse button.
We have only one more task left: to add all our favourite things to the Apple Menu Items folder.
Fill up that menu
The Apple Menu Items folder is the same one Mac OS 9 uses for the contents of its old-style Apple menu, which appears in the old upper-left location only when you're running Classic applications, just as in my first screenshot near the top of this page. But there's a bonus—the Apple Menu Items folder works with anything, just as it always has. That means Classic applications (as you would expect), folders, aliases, scripts, or native Mac OS X applications.
So, if you add a mix of Classic and new applications to the Apple Menu Items folder, it doesn't matter where you access them. If you choose a native Mac OS X application such as OmniGraffle from the Apple menu in Pro Tools running in Classic, OmniGraffle launches just fine in the yummy modern Aqua environment. Similarly, pick Photoshop 5 from the Apple Menu Items submenu of the Classic status menu in the Mac OS X Finder, and Photoshop launches fine in Classic, old-style menus and all. So let's get moving:
- Switch to the Finder, either by clicking on the desktop or by choosing the Finder icon in the Dock (or whatever favourite method you have).
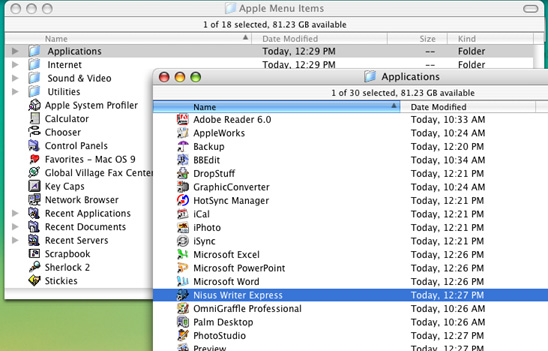
- Navigate to the Apple Menu Items folder, which lives at Macintosh HD/System Folder/Apple Menu Items. One way to get there is to choose Go > Go to Folder... from the menu bar, then type /System Folder/Apple Menu Items/ and press Return. But it's easier just to click on the Classic status menu (the "9"), then click the Apple Menu Items submenu itself. A Finder window opens right where you need it.
- Choose File > New Finder Window to create a second Finder window.
- Navigate to the /Applications/ folder (again, Go to Folder... > /Applications/ > Return is probably quickest).
- Drag the icons of the applications you want in your menu to the Apple Menu Items folder—but make sure you hold down the Command and Option keys before you release the mouse button, so that you make aliases instead of moving the original files, which could cause problems later.
- Navigate your second Finder window to /Applications (Mac OS 9)/ and do the same alias-dragging with the Classic applications you want in your menu, and continue with folders, documents, scripts, or whatever else you want to put in there.
- If you want, you can even create subfolders within the Apple Menu Items folder to organize it further (see the fourth screenshot). If you want the subfolders to sort at the top of the menu, but a space at the beginnings of their names (for example, " Internet" instead of "Internet").
Start Apple menuing
 When you're done, close your Finder windows (not strictly necessary, but it cleans things up). You've now populated both your Apple menu (in Classic applications) and the Apple Menu Items subfolder of your Classic status menu with useful items. Just click on the little "9" icon, navigate to the Apple Menu Items submenu, and there you are (see the fifth screenshot). There is, of course, a discrepancy:
- In Classic applications, you use the Apple menu in the upper left corner of the screen.
- In native Mac OS X applications, including the Finder, you use the Classic status menu in the upper right corner of the screen, and you have to step through one extra level of hierarchy to reach your applications and stuff.
Menus, and especially the Apple menu, already behave so differently in the two environments that the extra inconsistency doesn't bother me at all.
You can add to or otherwise alter the Apple Menu Items anytime. It's just as flexible as the old Apple menu—maybe a bit more, since as far as I can tell there is no limit to how far the submenus can go. Add an alias of your hard disk to the menu, and you can navigate right down through ten or twelve levels of folders, which is something the old Apple menu never let you do.
However, the Classic status menu method takes effect globally for all users on your Mac, since there is only one Apple Menu Items folder. So there is no way for individual users to customize what's in it. They can move the little "9" to a different spot on the menu bar, or turn it off altogether.
NOTE: Some Classic applications that appeared in the Apple Menu Items submenu in the native Aqua interface didn't initially appear in the Classic Apple menu, but I couldn't figure out quite why, since there wasn't a consistent pattern. Restarting my Mac (not just Classic) solved the problem.
![]() If you find this article useful, feel free to consider making a donation (any amount, credit cards accepted), which helps pay for hosting this website. Thanks!
If you find this article useful, feel free to consider making a donation (any amount, credit cards accepted), which helps pay for hosting this website. Thanks!
« Penmachine.com home « Long article index
Page BBEdited on 23-Jun-04
© 2004 Derek K. Miller. Some rights reserved. You may use content from this site non-commercially if you give me credit, under the terms of my Creative Commons license.
![]()