Taking pictures of fireworks or light shows or night cityscapes without a tripod is a fool's game. But sometimes I'm foolish, and try it—and sometimes it works. But you need to know a few things, so I'll give you some suggestions if you find yourself in a nighttime photography situation without a normal camera support.
These days, cameras (especially digital SLRs) are remarkably capable and smart. In most situations you can put them in Program or Full Auto mode, compose your shot, and press the button to get a good result. When I'm snapping family pictures, that's usually what I do. But when it gets really dark, the camera's smarts usually fail, even if today's amazing digital sensors can still pull good images out of the murk. But you need to figure out the proper settings in your camera's Manual mode. So I find having a few decades of photographic experience and nerdery under my belt helps me know what to do.
A sandbag substitute
Here, for example, is a shot of the World of Color water-and-light show displayed each night at Disney's California Adventure park in Anaheim this summer:
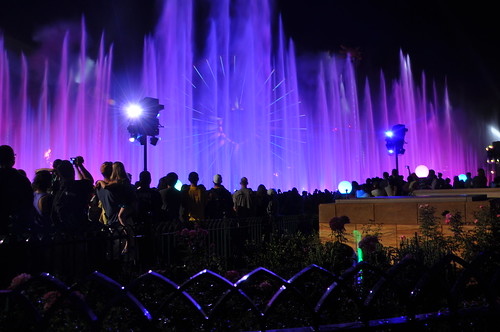
For a scene like that to come out well, I needed to use my Nikon D90 camera's lowest sensitivity (ISO 200) to avoid nasty grain and noise, but that meant I also needed to use a fairly long shutter speed (half a second) and a small aperture (f/8) to keep details in focus.
Normally that would result in a blurry picture without a tripod, because a half-second exposure reveals all sorts of camera shake from unavoidably unsteady human hands. We just can't hold still enough. Here's how I sidestepped that problem:
- I was sitting down on a bench, with my Crumpler shoulder bag and one of my daughters' sweaters on my lap. I could set my camera down on them (as some photographers do with sandbags) and adjust the bag and sweater to keep it level and aimed in the right direction. Voilà—tripod substitute.
- The zoom lens I was using includes vibration reduction, which helps reduce camera shake electromechanically. I also zoomed out as far as the lens could go (18 mm focal length) so any visible blurring was reduced by the wide field of view.
- I took lots of photos, one after the other, and only kept the good ones. Some shake is still unavoidable, but since it's random, a few pictures come out sharp anyway. I could have used my wireless remote shutter release and self-timer delay to minimize shake further, but that was more work than I wanted to do.
Hold your breath
Okay, how about a picture of some fireworks from the next night?
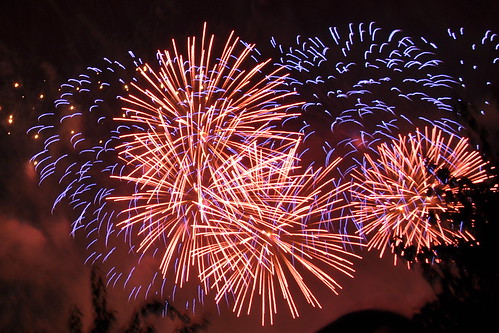
In this case, there was nowhere to sit down, so my family and I were standing among the throng at the north end of Main Street U.S.A. in Disneyland. Ideally, there would have been some object (a rock, the edge of a lamppost, a fence support) that I could have propped the camera on or against, but no luck. Photographing fireworks without a tripod, standing up, and without any nearby supports is especially difficult, because not only are there shaky hands to deal with, but there's a shaky torso and legs too.
Fireworks require a slow shutter speed (at least one second, as here, preferably more) to record the pretty trails and bursts rather than freeze them as mere dots, and in this situation I used an f/8 aperture again most of the time, and ISO 200. What did I do to get reasonably sharp results?
- It was the same lens with vibration reduction, which probably helped a little, and I once again zoomed out a fair bit but not all the way (to 26 mm focal length this time), since the fireworks were a tad farther away than the water show the previous night.
- I stood with my legs a little more than shoulder width apart, feet flat, to be as steady as possible. Rather than keeping the camera up at eye level looking through the viewfinder, or worse, holding it in front of me to look at the LCD screen, instead I held it tight against my chest, once more for maximum steadiness, and pointed my lens in roughly the proper direction. Not looking through the finder also let me enjoy the show while watching it with my own eyes, instead of through a lens as might happen otherwise.
- Once more, I took lots of photos hoping for a few keepers by luck of the draw. For each picture, I squeezed the shutter release as gently as I could while keeping my other hand firmly pressing the camera body against my sternum, and I held my breath both before and during the exposure—something I've heard snipers do too, to steady their weapons. Thus it was inhale, hold breath, squeeze, wait for shutter, breathe out, inhale, hold breath, squeeze...and so on.
- Every once in a while, but not for every shot, I looked at the LCD screen to see if I needed to adjust anything, in case things were over- or underexposed. I tried sequences of pictures with different shutter speeds and apertures to see if they produced better images.
There were a lot of rejects, but a decent number of nice photos too. I was surprised how well the breath-holding method worked. But it sure would have been better with a tripod, when exposures as long as 8 or 10 seconds or more are feasible, yielding still prettier pictures.
When you have to crank the ISO
My last challenge came at the end of our flight home on Monday, as we passed over Washington and the B.C. Lower Mainland after the sun had set. I always enjoy photographing our local volcanoes, and this time we got great views of Mt. Adams, Mt. Rainier, and Mt. Baker, as well as the gleaming lights of Vancouver and its suburbs as we came in for a landing:
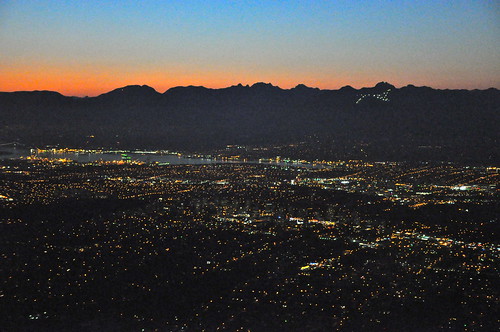
Unfortunately, even a tripod would do no good in this situation (not to mention the awkwardness of setting it up on an airplane seat). By this time it was very, very dark: I could see the city lights, but could only barely make out the silhouettes of the mountains in the background. It looked a fair bit darker than the photo shows, in fact. And camera shake was not really an issue: the key problem was that the plane was moving at several hundred kilometres per hour. Long shutter speeds were out of the question.
This is when the drastically improved low-light sensitivity of modern cameras comes in handy. I guessed that the slowest shutter speed I could get away with was about 1/30 of a second, though even that was pushing it:
- I propped the front of the lens against the window and shaded it with my hand to prevent any reflections from the cabin lights.
- At a zoom of 50 mm to get the framing I wanted, the best aperture the camera could provide was f/5, which meant boosting the ISO (sensitivity) to 3200. (The D90 has an ISO 6400, but that's so noisy I never use it.) I set all that manually, and even then the picture was significantly underexposed as I shot it.
- Finally, because of the underexposure, I boosted the levels even more on my computer after I'd downloaded the photo from my camera. With that fiddling, the orange sky and water reflection emerged from the gloom, and the lights became starlike points rather than dull spots.
There are a lot of digital artifacts in the final result, particularly in the sky, but it's still quite pretty and I was happy to post it.

Thanks for this! Useful tips, all.
There was a girl with a DSLR (I could hear the shutter) sitting behind us at the Celebration of Light yesterday who was taking shot after shot... on automatic. With flash. Every time there was a nice explosion, there came blinding click FLASH click FLASH behind us, and then she'd spend a few minutes fiddling with the camera, probably wondering why her photos weren't turning out. And then... she'd do it again. STILL WITH FLASH. I almost strangled her. Every five minutes I was gripped with the nearly uncontrollable urge to shout something obscene about people who don't read their manuals. I restrained myself.
Anyhoo. Even if you're not so into using the Adult Settings, most pro-sumer cameras actually do have a "fireworks" preset mode that disables the flash and with some fairly sane defaults can churn out fairly decent low-light photos.
(Gotta admit, I have image stabilization on my favourite lens and it's made me a bit lazy about lugging a tripod with me. It's SUPER.)
I have a couple of tricks i use and have worked for me shooting video in the field and my wife shooting stills in nasty places;
Video/ photo makeshift steadycam:
1) old Tennisball filled with brass shot or lead if you hate the environment. then a make a tripod mount post with 6 inches of threaded rod. Fix into tennisball. screw into tripod thread on camera. weight of ball works like steadycam fits into small bag.
2) Tape Sling monopod: 5ft of nylon tubluar webbing from MEC or any surplus store. 1 tripod mount plate. duct tape.
Attach tube webbing to mount plate, other end of webbing wrap duct tape. attach plate to cam stand on webbing, pull webbing tight. becomes a pretty stable monopod.
Great suggestions, Steven. Of course, if I'd just brought my actual monopod that would have solved the problem too. Although even as long ago as 1986 I had airport security looking suspiciously at the barrel-shaped metal thing in my luggage when I tried that.
Following Renee's comment, I realize I should have mentioned what seems obvious to any experienced photographer: a flash is completely useless in any of these situations, since everything you want to see is too far away to be illuminated by it, and since you're photographing things that are themselves lit up (lights on and in water, fireworks, city streetlamps), there would be no point in shining more light on them. So turn your flash off, since all it can do is produce photo-ruining reflections, bother people around you, or trick your camera into taking a wrong exposure anyway.
That said, other people's useless (to them) flashes introduced a few neat effects, such as lighting up nearby audience members, in a couple of my Disney pictures.